




-

About Flexfilm 2
-

Getting Started 10
-
Core Fundamentals 10
-
-

Orders & Support 83
-
Shipping 10
-
Dealer Rewards 13
-
Ordering & Account 7
-
Pre-Cut Patterns 2
-
General 9
-
Warranty 6
-
Billing & Tax 3
-
Route Package Protection 2
-
Returns & Refunds 2
-
Shop Pay 2
-
Training 1
-
Dealer & Installer Program 4
-
Selling & Quoting 9
-
Marketing & Growth 8
-
Business Operations 5
-
-

Installation Resources 19
-
Architectural 4
-
Automotive 5
-
General 10
-
-

Architectural Window Film 55
-
Safety & Compatibility 18
-
Ownership 2
-
Fundamentals 16
-
Buying Guides 4
-
Performance & Privacy 6
-
Product Guides 9
-
-

Automotive Window Film 40
-
Installation & Ownership 18
-
Product Guides 11
-
Legal & Compliance 3
-
Buying Guides 8
-
-

Tools 10
-
Cutting & Prep 3
-
Application 3
-
Measurement & Layout 2
-
Specialty 2
-
-

Plotters 8
-
Ownership 6
-
Buying Guides 2
-
-

FlexCut Software 25
-
Account & Licensing 5
-
Getting Started 10
-
Troubleshooting 2
-
Using FlexCut 8
-
-

Paint Protection Film (PPF) 10
-
Ownership 3
-
Fundamentals 4
-
Product Guides 3
-
-

Surface Coatings 13
-
Product Guides 7
-
Fundamentals 3
-
Ownership 3
-
Reports


Reports
The Reports feature allows you to track and analyze cutting activity performed within the software. Reports can help you review cut history, user activity, and material usage for better workflow management and accountability.
Several different report types are available depending on the information you want to review.
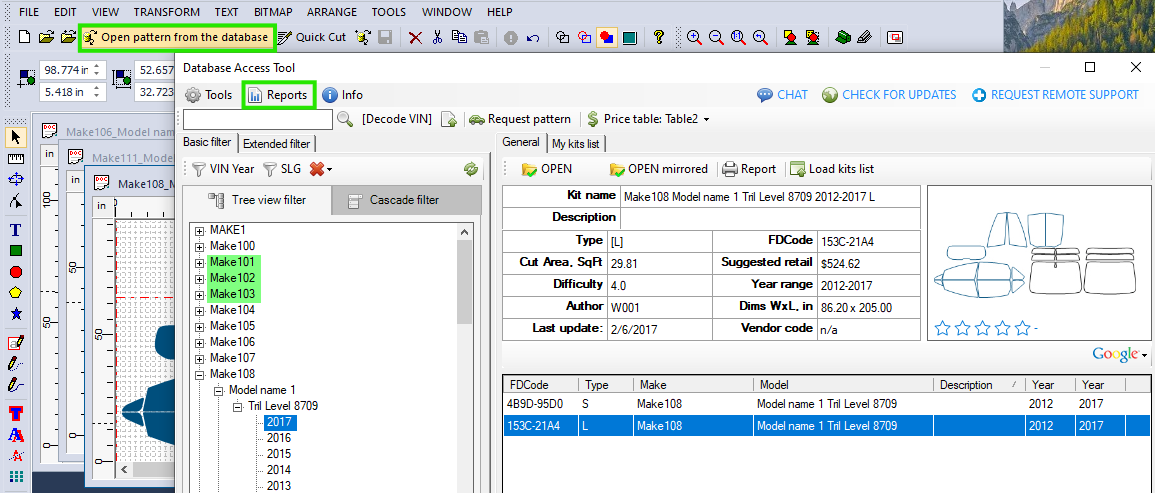
Access Reports
- Open the Database Access Tool by clicking “Open pattern from the database” in the top menu.
- In the Database Access Tool, go to Reports > All Reports...
The Report Tool will open and display the available reports.
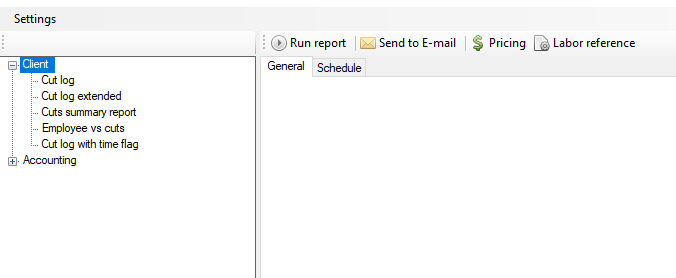
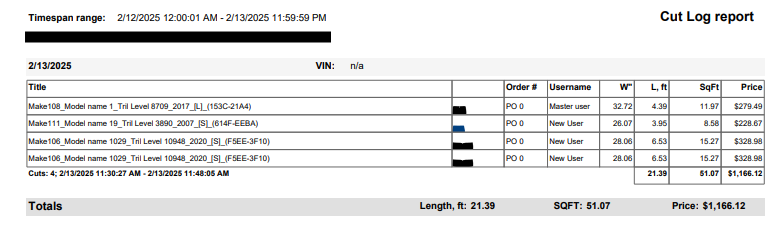
Cut Log Report
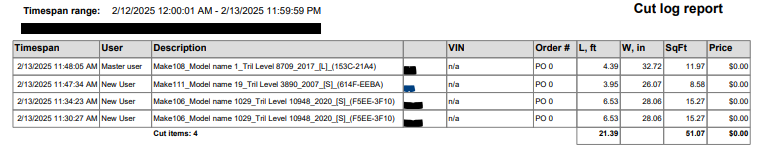
The Cut Log Report tracks cutting activity within a specified time period.
It provides detailed information about cuts performed during the selected timeframe, including:
- User
- Pattern details
- Square footage
- Length
- Width
- Price, if a Price Table was applied
This report can help you monitor workflow and material usage across users.
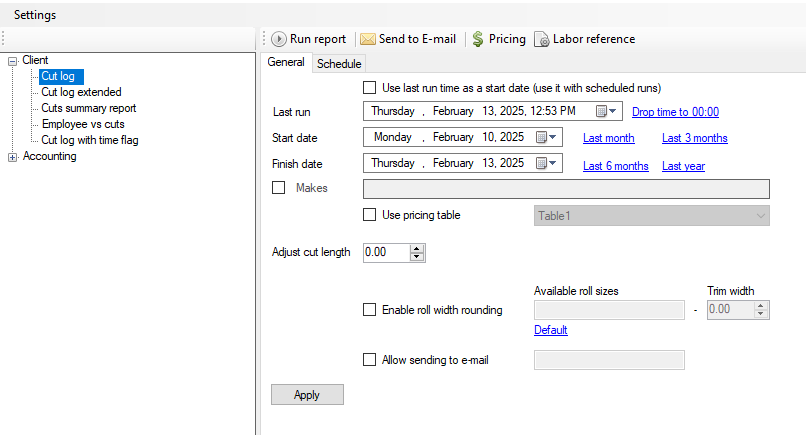
Film Usage Settings
To ensure accurate film usage reporting, use the following settings:
- Trim Width: 0.7
- Adjust Cut Length: 3.5
These adjustments prevent extra film from being included in the report by excluding the film roll edges and feed margin.
Filter by Make
You can refine the Cut Log Report by filtering for specific vehicle makes.
For example, if you want to determine how many BMW patterns were cut during a particular period, apply the Make filter to display only BMW records.
After configuring the report:
- Click “Apply” to save your selections.
- Click “Run report” at the top of the window.
Cut Log Extended Report
The Cut Log Extended Report expands on the Cut Log Report with additional filtering and customization options.
In addition to filtering by Make, you can filter by Pattern Type, including:
- Short patterns
- Long patterns
- Graphics
Additional filtering options include:
- Order Number: Narrow the report to specific orders.
- Grouping Options: Organize the report by VIN or Order ID, or prioritize tint patterns at the top.
- Timeframe Customization: Ignore today's cuts when you want a retrospective view of previous cutting activity.
The Cut Log Extended Report provides greater flexibility when you need to analyze cutting activity using more specific criteria.
Cuts Summary Report
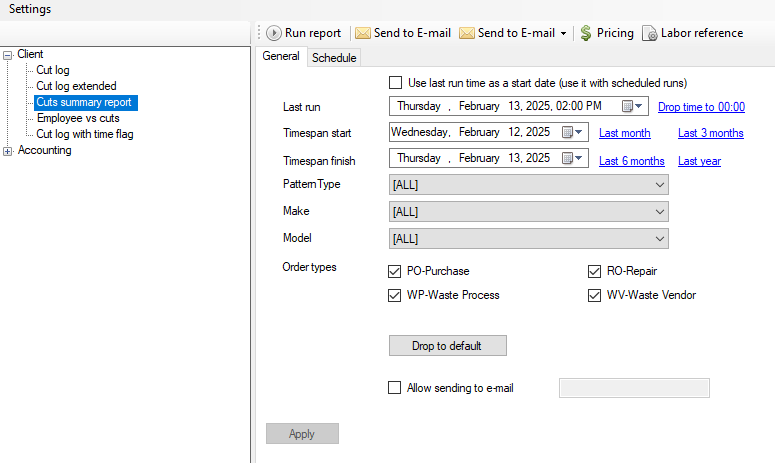
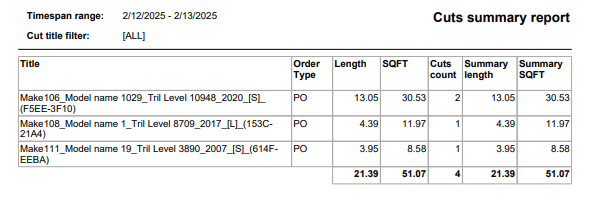
The Cuts Summary Report provides a high-level overview of all cuts performed during a specified time period.
Unlike the Cut Log Report, the Cuts Summary Report does not provide a user-by-user breakdown. Instead, it is designed for quickly reviewing overall cutting activity.
Available filters include:
- Order Types: View cuts based on specific order categories.
- Pattern Types: Filter by Short patterns, Long patterns, Graphics, and other pattern types.
- Makes and Models: Narrow the report to specific vehicle manufacturers and models.
The Cuts Summary Report is useful when you want a broad overview of production activity while still being able to filter the results.
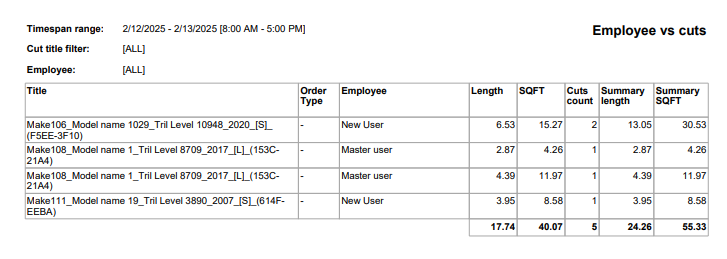
Employee vs. Cuts Report
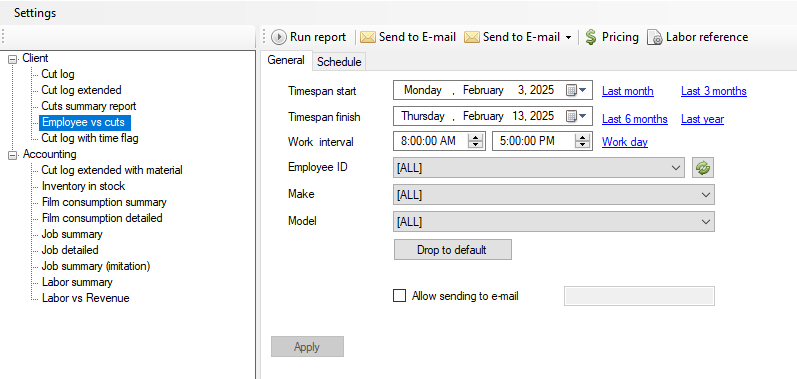
The Employee vs. Cuts Report expands on the Cuts Summary Report by providing a breakdown of cutting activity by employee.
This allows you to track and compare the cuts performed by different users during a specified timeframe.
Available options include:
- Employee Selection: Generate the report for all employees or select specific users.
- Make & Model Filters: Refine the report by specific vehicle manufacturers and models.
This report can be useful for performance tracking, accountability, and workflow analysis by showing the cutting activity associated with individual employees.
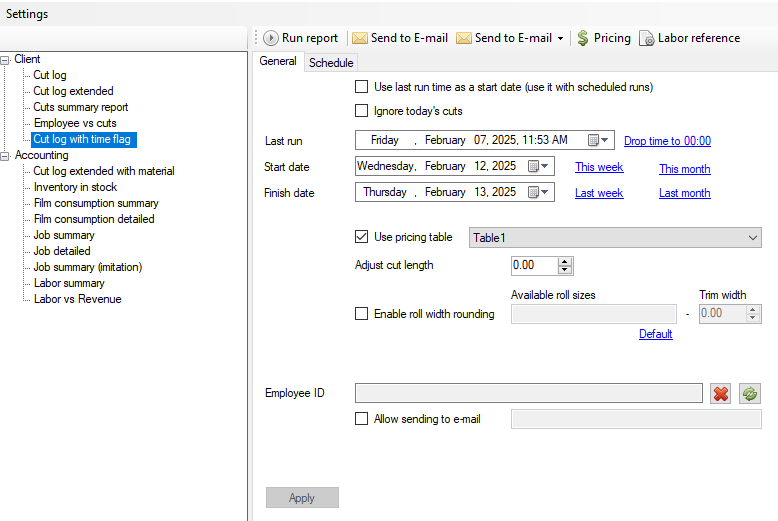
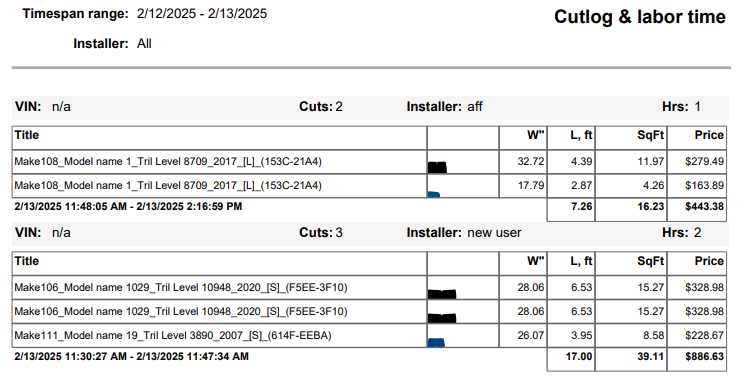
Cut Log with Time Flag Report
The Cut Log with Time Flag Report provides a detailed breakdown of cutting activity by employee, including the total number of cuts performed and the time spent on each cut during a specified period.
Available options include:
- Employee Selection: Generate the report for all users or select specific employees.
- Time Tracking: Review how much time each user spent cutting patterns.
- Custom Price Table Application: Apply a custom Price Table to adjust pricing within the report.
This report can help analyze employee efficiency, workload distribution, and pricing associated with cutting activity.
Reports Scheduling
Reports can also be generated and sent automatically on a schedule.
Report Scheduling uses Microsoft Task Scheduler to automate report generation at specified intervals. Once a schedule has been created, it can also be found in Windows Task Scheduler for advanced management.
Report Scheduling is available for all reports except the Employee vs. Cuts Report.
Set Up an Automatic Report
Go to:
Reports > All Reports
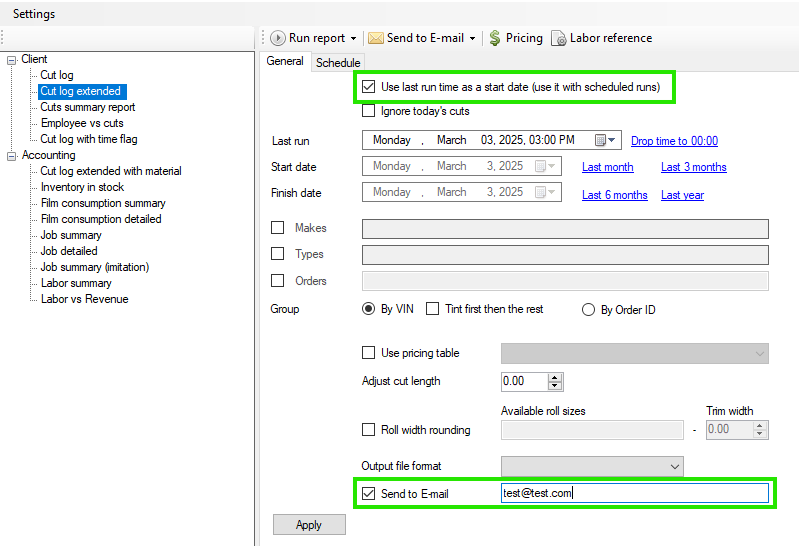
Select the report you want to schedule. The example shown here uses the Cut Log Extended report.
Set the Reporting Period
Open the General tab and select:
“Use last run time as a start date”
When this option is enabled, the start date of the next reporting period is automatically set to the date of the previous report.
This creates a continuous reporting sequence and helps prevent gaps between scheduled reports.
Set Up Email Delivery
Check “Send to E-Mail” and enter the email address where you want the report delivered.
To send the report to multiple recipients, separate each email address with a comma.
Create the Schedule
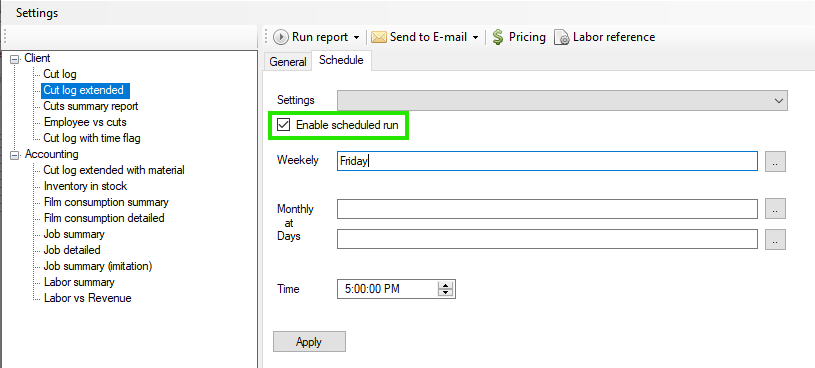
Open the Schedule tab and check:
“Enable scheduled run”
You can then choose when the report should run automatically.
For example, you can:
- Run the report on a specific day of the week, such as Friday at 5:00 PM.
- Run the report monthly on a designated date.
INSERT ENABLE SCHEDULED RUN SCREENSHOT HERE
Save and Test the Schedule
Once you are satisfied with the schedule, click “Apply” to save your settings.
Before relying on the automatic schedule, click “Send to E-Mail” to perform a test.
Confirm that the intended recipients receive the report. This verifies that the email delivery and scheduling configuration are working correctly.




