-

About Flexfilm 2
-

Getting Started 10
-
Core Fundamentals 10
-
-

Orders & Support 83
-
Shipping 10
-
Dealer Rewards 13
-
Ordering & Account 7
-
Pre-Cut Patterns 2
-
General 9
-
Warranty 6
-
Billing & Tax 3
-
Route Package Protection 2
-
Returns & Refunds 2
-
Shop Pay 2
-
Training 1
-
Dealer & Installer Program 4
-
Selling & Quoting 9
-
Marketing & Growth 8
-
Business Operations 5
-
-

Installation Resources 19
-
Architectural 4
-
Automotive 5
-
General 10
-
-

Architectural Window Film 55
-
Safety & Compatibility 18
-
Ownership 2
-
Fundamentals 16
-
Buying Guides 4
-
Performance & Privacy 6
-
Product Guides 9
-
-

Automotive Window Film 40
-
Installation & Ownership 18
-
Product Guides 11
-
Legal & Compliance 3
-
Buying Guides 8
-
-

Tools 10
-
Cutting & Prep 3
-
Application 3
-
Measurement & Layout 2
-
Specialty 2
-
-

Plotters 8
-
Ownership 6
-
Buying Guides 2
-
-

FlexCut Software 25
-
Account & Licensing 5
-
Getting Started 10
-
Troubleshooting 2
-
Using FlexCut 8
-
-

Paint Protection Film (PPF) 10
-
Ownership 3
-
Fundamentals 4
-
Product Guides 3
-
-

Surface Coatings 13
-
Product Guides 7
-
Fundamentals 3
-
Ownership 3
-
The Software Interface


The Software Interface
Main Window
When you launch the software, an introductory window will appear showing the program version and registration number. After a few seconds, the main working area will open.

The main window includes the following elements:
- Title Bar: Located at the top of the window, with the control menu on the left and the maximize and minimize buttons on the right.
- Window Border: Allows you to resize the window when it is not maximized.
- Menu Bar: Provides access to the software's various actions and functions.
- Button Bar: Contains shortcuts to frequently used options.
- Tool Bar: Includes creation tools and zoom controls.
- Working Area: The main workspace where designs and patterns are displayed. Guides appear to the left and above the working area to show the current dimensions. These guides can be disabled if desired.
- Scroll Bars: Located below and to the right of the working area. They allow you to view parts of the design that are not currently visible.
- Lower Flyout Menu: Provides quick access to additional functions and settings.
- Status Bar: Displays information about the current design and its properties.
- Control Center and Left Sidebar Shortcuts: Provide access to important tools for pattern transformations, plotter configuration, and cutting parameter adjustments. These areas can also display pattern-specific tips and warnings during the cutting process.
Working Area Orientation
The height of the working area corresponds to the width of the film roll, while the base corresponds to its length.
Make sure the design displayed horizontally in the software aligns correctly with the film roll. If it does not, the plotter or software may be configured incorrectly.
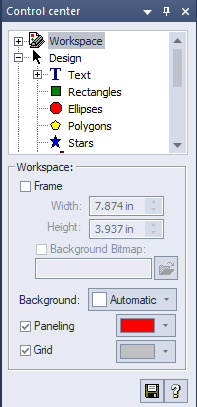
The Control Center
The Control Center is a flyout panel used to manage many of the software's functions and settings.
It can be positioned anywhere within the working area or docked to the left or right side of the main software window.
When docked, the Control Center becomes part of the main window and the working area automatically adjusts so that it remains visible.
The operation tree appears at the top of the Control Center. Available functions expand or collapse depending on the objects selected and the actions that are currently available.
Functions are organized into primary sections with optional sub-branches.
- Click the “+” symbol to expand hidden branches.
- The symbol will change to “–” when the section is expanded.
- Click the “–” symbol to collapse the section again.
The Undo button appears in many Control Center windows and performs the same function as the Undo button in the Transformations Bar or the Undo option in the Menu Bar.
Many changes made in the Control Center require you to click “Apply” before they take effect. If you manually change a value, be sure to click Apply to confirm the adjustment.
The Help button is available throughout the software and opens context-specific help for the window you are currently using.

Left Sidebar
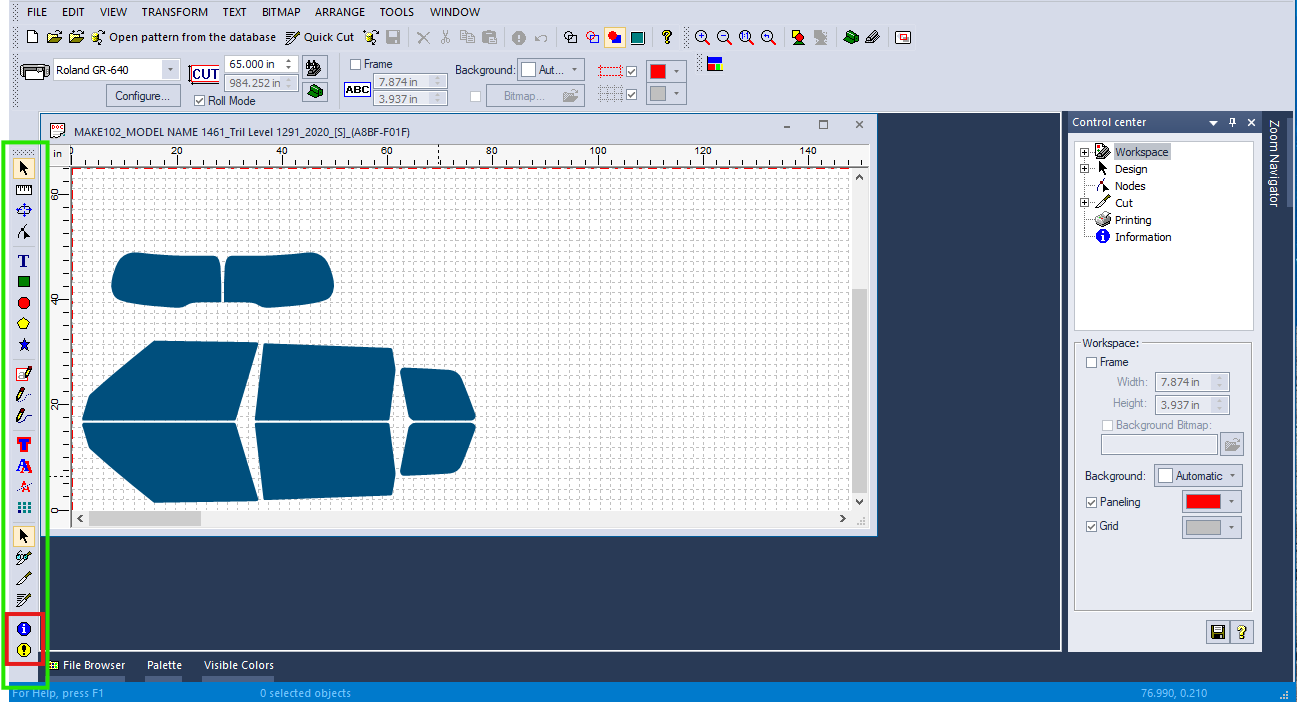
The Left Sidebar is permanently located on the left side of the main screen.
It provides quick access to many of the same essential functions available in the Control Center, helping streamline navigation and workflow.
The sidebar also contains two features that are not available elsewhere in the interface:
- Tips
- Warnings
These buttons are automatically enabled when the selected pattern contains a relevant tip or warning.
Click the appropriate button to open a message containing important information that can help improve accuracy and prevent common cutting errors.
The Navigation Window
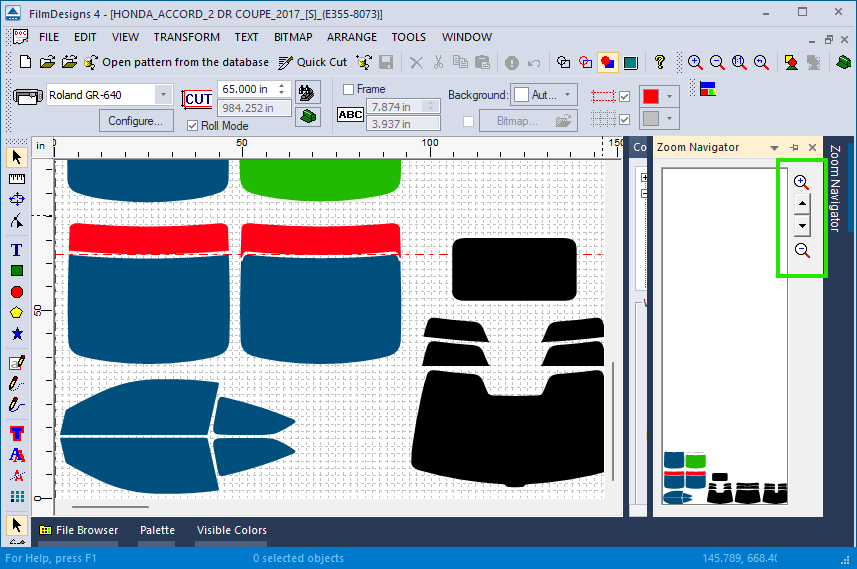
The Navigation Window helps you control the view of the software's working area.
It includes zoom controls and an overview of the entire design, allowing you to see which portion of the design is currently visible in the main working area.
Open the Navigation Window
Click the Zoom Navigator button located next to the Control Center.

Inside the Navigation Window, a rectangle or frame represents the portion of the design currently visible in the working area.
A point in the center of the frame can be used to reposition the visible area.
Click and move the center point to another part of the design to display that section in the main working area.
Create a New Viewing Frame
To create a new frame around a specific section of the design:
- Click inside the Navigation Window.
- Drag the mouse to draw a frame around the area you want to view.
The new frame determines which section of the design appears in the working area.
The frame will automatically adjust to match the proportions of the main working area. For example, if you draw a very elongated frame, the software may reshape it to maintain the correct aspect ratio.
Adjust the Zoom Level
To resize the frame and change the zoom level, click one of the frame's corners.
When the cursor changes shape, click and hold the mouse button, then drag the corner to enlarge or reduce the frame.
Two additional buttons located to the right of the Navigation Window can also increase or decrease the frame size.
Changing the frame size changes the zoom level of the working area, making it easier to focus on specific sections of the design.