




-

About Flexfilm 2
-

Getting Started 10
-
Core Fundamentals 10
-
-

Orders & Support 83
-
Shipping 10
-
Dealer Rewards 13
-
Ordering & Account 7
-
Pre-Cut Patterns 2
-
General 9
-
Warranty 6
-
Billing & Tax 3
-
Route Package Protection 2
-
Returns & Refunds 2
-
Shop Pay 2
-
Training 1
-
Dealer & Installer Program 4
-
Selling & Quoting 9
-
Marketing & Growth 8
-
Business Operations 5
-
-

Installation Resources 19
-
Architectural 4
-
Automotive 5
-
General 10
-
-

Architectural Window Film 55
-
Safety & Compatibility 18
-
Ownership 2
-
Fundamentals 16
-
Buying Guides 4
-
Performance & Privacy 6
-
Product Guides 9
-
-

Automotive Window Film 40
-
Installation & Ownership 18
-
Product Guides 11
-
Legal & Compliance 3
-
Buying Guides 8
-
-

Tools 10
-
Cutting & Prep 3
-
Application 3
-
Measurement & Layout 2
-
Specialty 2
-
-

Plotters 8
-
Ownership 6
-
Buying Guides 2
-
-

FlexCut Software 25
-
Account & Licensing 5
-
Getting Started 10
-
Troubleshooting 2
-
Using FlexCut 8
-
-

Paint Protection Film (PPF) 10
-
Ownership 3
-
Fundamentals 4
-
Product Guides 3
-
-

Surface Coatings 13
-
Product Guides 7
-
Fundamentals 3
-
Ownership 3
-
Cutting Patterns


Cutting Patterns
First, click “Open Pattern from the Database” and select the pattern you plan to cut in the Database Access Tool.
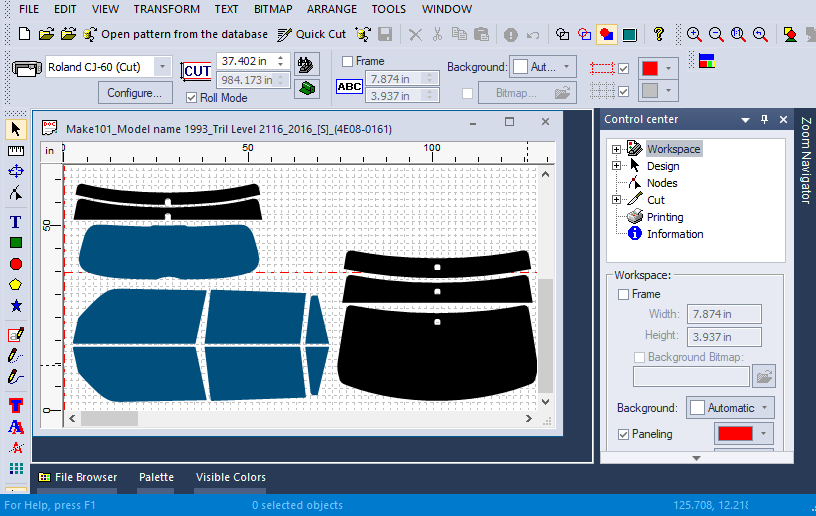
Cutting a Pattern
- Select the shape you want to send to the plotter.
- Always make sure only the single shape you intend to cut is selected. Otherwise, you may accidentally send the entire pattern set to the plotter.
- Press F5 to confirm that the correct shape is selected.
- Press Ctrl + F5, or open the File menu and select Cut!
- In the Cut window, click the “Cut...” button to send the selected shape to the plotter.
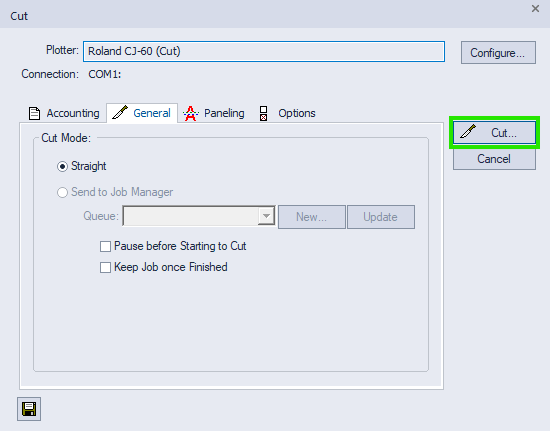
Cut Settings
The Cut window provides several settings that control how the selected pattern is sent to the plotter.
General
The General tab allows you to specify the Cut Mode and control what happens before and after the cut.
- Cut Mode: Select how the cutting job will be processed.
- Pause before Starting to Cut: Pauses the software before cutting begins.
- Keep Job once Finished: Keeps the cutting job open after the cut is complete.
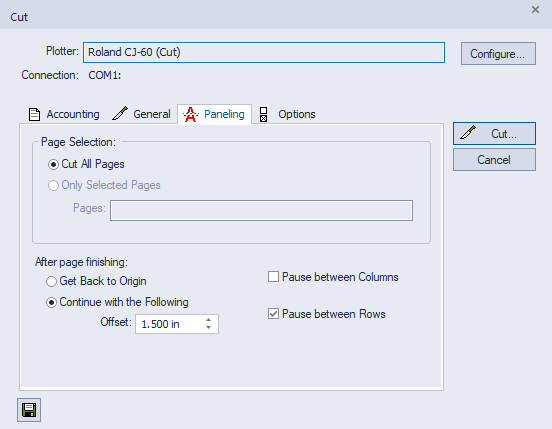
Paneling
The Paneling tab controls how multi-page designs are cut and what the plotter does after completing each section.
- Cut All Pages: Cuts all pages of the design.
- Only Selected Pages: Cuts only the pages you specify. If the design fits on a single page, this option will be disabled.
- Get Back to Origin: Returns to the origin after the design has been cut.
- Continue with the Following: Continues to the next section of the design after cutting.
- Offset: Allows you to manually set the offset between sections.
- You can also choose to pause between columns or rows.
Options
The Options tab provides additional controls for cutting quality, speed, force, and cut order.
- Adjust the Curve Cutting Resolution from highest to lowest.
- Adjust the Cutting Speed and Force.
- Choose the cutting order:
- Don't Order
- From Origin to End
- From End to Origin
- Enable Cut Inner Paths First.
- Enable Unidirectional Cutting.

Advanced Options
Click the “Advanced...” button in the Options tab to access additional plotter settings.
The Advanced Options window contains four tabs:
- Axes
- Plotter Control
- Enhancements
- Resolution
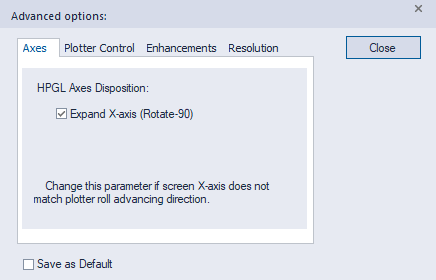
Axes
The Axes tab allows you to modify the HPGL Axes Disposition.
Select “Expand X-axis (Rotate-90)” if the X-axis shown on the screen does not match the plotter's roll advancement direction.
You can save this setting as the default by selecting “Save as Default.”
Plotter Control
The Plotter Control tab allows you to adjust the following settings directly within the software:
- Cutting Speed
- Tool Force
- Tool Acceleration
Uncheck these options if you prefer to configure these settings manually on the plotter.
You can save these settings as the default by selecting “Save as Default.”
Enhancements
The Enhancements tab provides additional options that can help improve cutting quality, particularly when using an older plotter.
- Close Figures: Enable this option if the plotter does not properly close figures.
- Turn Blade: Enable this option to improve corner cutting quality.
- Use Arcs for Curves: Allows arcs to be used when cutting curves.
You can save these settings as the default by selecting “Save as Default.”
Resolution
The Resolution tab allows you to adjust the conversion factors between design units (mm) and plotter units (steps) for both the X and Y axes.
You can set these values as the default for the plotter by selecting “Set as Default values for this plotter.”
You can also save the settings as the default by selecting “Save as Default.”




