




-

About Flexfilm 2
-

Getting Started 10
-
Core Fundamentals 10
-
-

Orders & Support 83
-
Shipping 10
-
Dealer Rewards 13
-
Ordering & Account 7
-
Pre-Cut Patterns 2
-
General 9
-
Warranty 6
-
Billing & Tax 3
-
Route Package Protection 2
-
Returns & Refunds 2
-
Shop Pay 2
-
Training 1
-
Dealer & Installer Program 4
-
Selling & Quoting 9
-
Marketing & Growth 8
-
Business Operations 5
-
-

Installation Resources 19
-
Architectural 4
-
Automotive 5
-
General 10
-
-

Architectural Window Film 55
-
Safety & Compatibility 18
-
Ownership 2
-
Fundamentals 16
-
Buying Guides 4
-
Performance & Privacy 6
-
Product Guides 9
-
-

Automotive Window Film 40
-
Installation & Ownership 18
-
Product Guides 11
-
Legal & Compliance 3
-
Buying Guides 8
-
-

Tools 10
-
Cutting & Prep 3
-
Application 3
-
Measurement & Layout 2
-
Specialty 2
-
-

Plotters 8
-
Ownership 6
-
Buying Guides 2
-
-

FlexCut Software 25
-
Account & Licensing 5
-
Getting Started 10
-
Troubleshooting 2
-
Using FlexCut 8
-
-

Paint Protection Film (PPF) 10
-
Ownership 3
-
Fundamentals 4
-
Product Guides 3
-
-

Surface Coatings 13
-
Product Guides 7
-
Fundamentals 3
-
Ownership 3
-
Adding Multiple Users


Adding Multiple Users
If your company has multiple employees using the software under a single license key, you can create individual user accounts to track who performs each cut.
This feature can help improve workflow management and accountability. Once multiple users are set up, you can also generate Reports with detailed cutting statistics by user, allowing you to track usage and analyze productivity.
Access the User Settings
- Go to Edit in the top navigation bar.
- Select Preferences to open the settings panel.
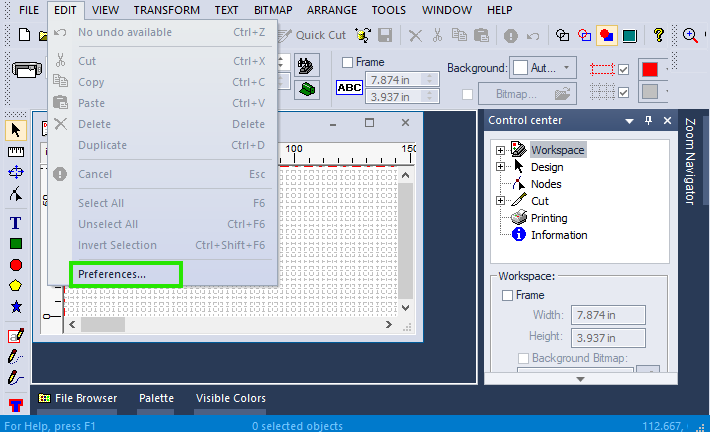
- Open the Cut Accounting tab.
- Enter the password to access the Log Accounting Settings.
The default password for the Master User, which is the first registered user of the system, is:
AFF1234

For security purposes, it is recommended that you change the default password after the initial setup.
Enable User Control
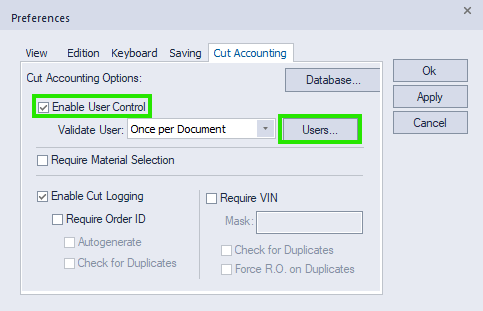
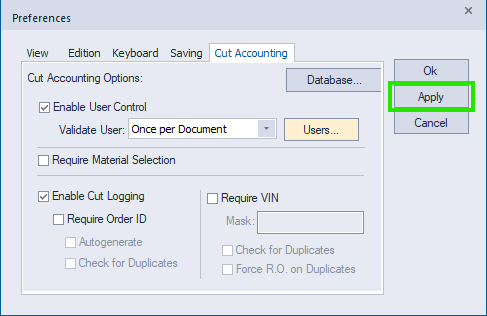
After entering the password, you will be taken to the Cut Accounting Options.
- Make sure “Enable User Control” is selected.
- Click the “Users” button to manage user accounts.
Add a New User
The User List window will display the default Master User account that was used to access the Cut Accounting Options.
You can change the Master User's password by selecting the account and clicking “Edit.”
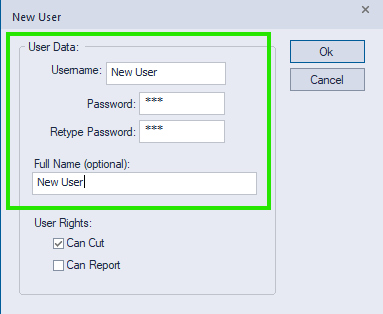
To create another user:
- Click “New.”
- Enter the required user information, including the username and password.
- Enter the user's full name if desired.
- Assign the appropriate user rights.

User Rights
Each user can be assigned one or both of the following permissions:
- Can Cut: Allows the user to cut patterns.
- Can Report: Allows the user to access reports.
Select the permissions appropriate for the user's role, then click “OK” to save the new user's information.
Save the New User
The newly added user will now appear in the User List.
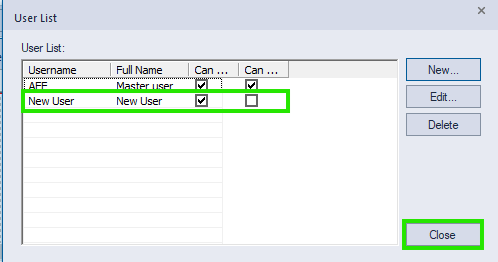
- Click “Close” to exit the User List window.
- In the Preferences window, click “Apply” to save your changes.
- Click “OK” to finalize the updates.
Be sure to provide each user with the password assigned to their account so they can access the system.
Tracking Cuts by User
After User Control is enabled, users will be prompted to enter their password when they attempt to cut a pattern.
This allows the software to identify which user performed each cut. Detailed cutting statistics can then be reviewed later in the Reports section.




